Step 1. Installation:
Go to your Joomla backend and install eXtroForms.
After a successful installation, go to components and click on the Link eXtroForms.
Step 2. Construction of a Form. Click the NEW button and fill out the fields step by step.
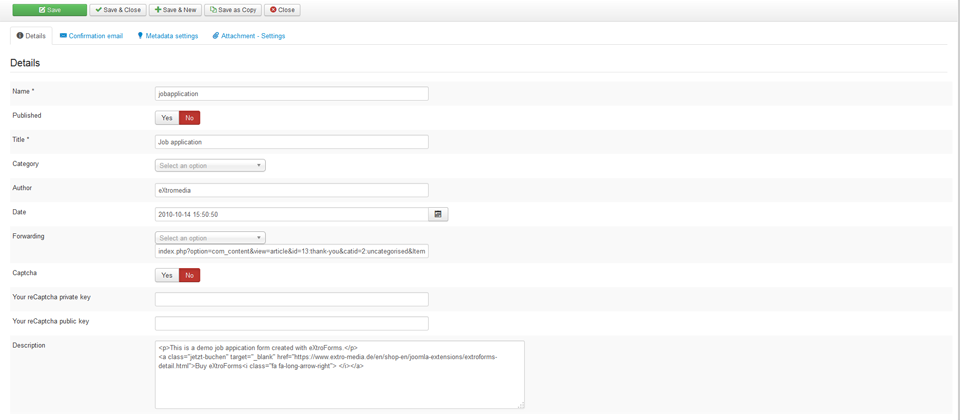
- Enter a internal name (use only small letter and numbers, don't use special characters).
- Choose a title for the Form (the title will be shown as heading 1).
- Type in the name of the Creator (important for SEO).
- Type in the Date of construction (important for SEO).
- Select a existing page where the User will be redirected after a successful frontend fill in.
- Select whether the Form should be protected by spam mechanism of extro-media.de or additional from ReCaptcha.
- Fill in the privateKey of your ReCaptcha-Account (Requires a Google ReCaptcha account). Create an account at http://www.google.com/recaptcha.
- Fill in the publicKey of your ReCaptcha-Account (Requires a Google ReCaptcha account). Create an account at http://www.google.com/recaptcha.
- Enter a Description or a Introduction Text.
- Enter the Metadescription and the Metakey.
- The upload directory specifies where the up-loaded files can be found.
- Choose if the Forms should send an E-mail or not by Typing in the Sender eMailadress.
- If you need a distribution list, seperate the eMailadresses with a ",". Due to data protection the Form sends the distribution list to the recipient only in BCC mode. If there is a Passwordfield in the Form, only the User who signed up gets the Password in clear Text, the dispatcher list and the sender get it encrypted.
- Enter a subject for the eMail.
- Enter a message for the eMail. Entered data from the Forms will automatically attached.
- If you want to use the form as an autoresponder, you can additionally select a file from the Dropdown menu as an attachment. If you need to upload the file press the green upload-button, at the top. The standard Joomla upload-manager will be loaded.
- Save the Form.
If you'd like to change the look of a Form, you need to edit the respective css file.
Step 3. Create fields: Go to the Field-Manager
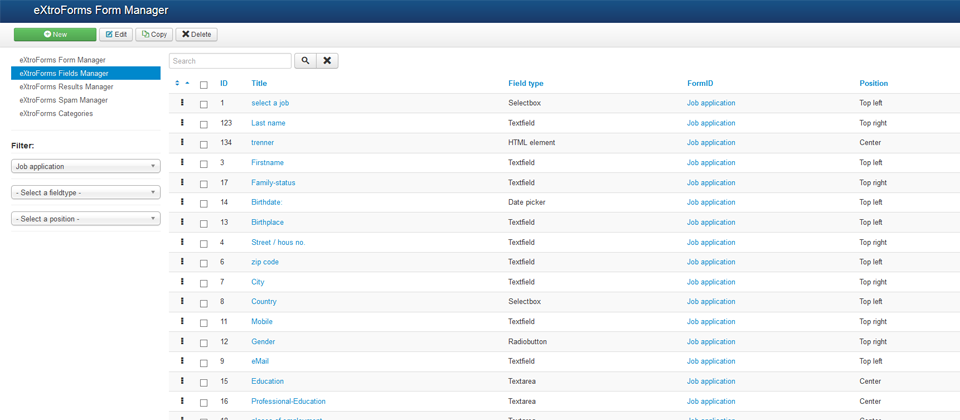
Press the New Button.
Select a fieldtype.
- Radio-Button
- Checkbox
- Button (send, reset)
- text field
- text area
- File Upload
- Hidden-Element
- Selectlist (Dropdown, Single-Select, Multi-Select)
- HTML-Elements
- Date picker
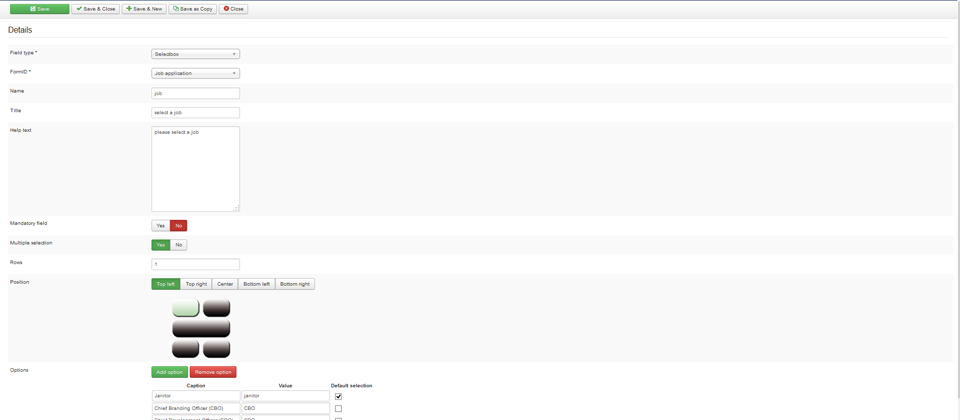
we show you at the example "Select" how you can create a multi-select, single-select or a drop-down-list.
- Enter a internal name (use only small letter and numbers, don't use special characters).
- Enter a label for the field.
- Describe the user what data they should enter (tooltip).
- Select if the field is mandatory or not.
- Multi-Select: No is the basis for a dropdown list.
- You should select only "1" row if you like to build a drop down list.
- with eXtroForms you have 5 standard positions to put the fields into the content (top left, top right, center, bottom left, bottom right).
- Enter the value that should be saved in the database when the user checks this field.
- at the field Content you can manage the created value and caption.
we show you at the example Textfield how you create textfields and textareas and manage their options.
- After the selection of the field type, form, internal name, label, and help text, select if the field is mandatory or not.
- select the maximum size of characters for the field.
- select the minimum size of characters for the field.
- define the widht of the field.
- Choose the form-field position.
- Select a subtype for the field.
subtypes:
- Password: hide number and characters and show replacement characters.
- E-mail: checks the eMailadress for conformity (automatically filled in for logged in users). If a email field is present, the form user will get a confirmation email (if email funcionality is enabled for this form)
- Number: the field accepts only numbers.
- URL: will check for a standard conform url.
- automatic increment fill in the Account details like, real name, username and emailadresses.
If you use a upload-field, please be careful what files you allow to upload. Upload-fields can be a risk for your system integrity.
the hidden element can save the ip or other pre defined values.
the HTML-element is a standard joomla editor.
additionally, we implemented the normal Joomla date picker to the Forms.
Use copy to duplicate fields. select the fields with the checkboxes and klick on the button duplicate. duplicated fields will be listed with the extension "copy from ...".
To preview a form, select a field with the checkbox and click on the button preview.
Create a new menu item for your form
- In the backend, go to the menu manager (menu -> [your menu])
- Click on new to create a new menu item
- Select the menu item type, choose one of the eXtroForms views in the modal window
- On the right side, select your form in Required Settings
- Enter a name for your menu item
- Save and take a look at the frontend, there you should see your new menu item
Step 4. manage your results in the result manager.
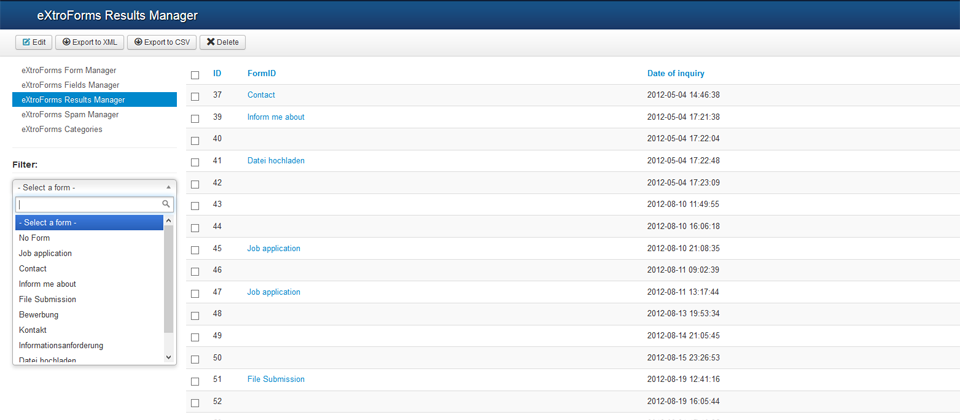
click on the result and the results will be loaded in the detailed data view.
in the detailed data view, uploaded files can be stored according to their causes on the local computer, without a additional program.
export the data: select in the resultmanager the result that you would like to export and click on CSV or XML to export the file.
Step 5. how to use the Spam manager?
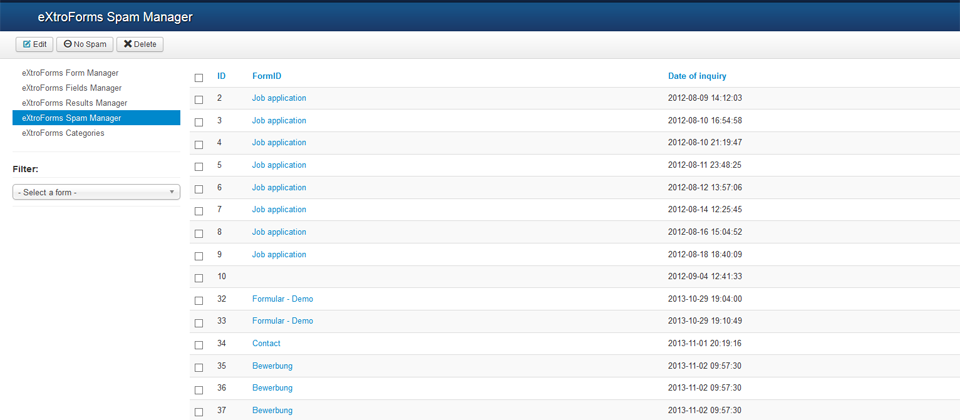
spam will be filtered via defined rules by the spam-manager.
You can move falsely declared entries into the regular Result manager.
Select the entry with the checkbox and click on the button NoSpam.
The result will be moved to the regular result-manager.
How to migrate your eXtroForms installation from Joomla 2.5 to Joomla 3.
As you may know, Jooma 2.5 has reach it's end-of-life (EOL) on 31. December 2014. This means that there will be no more security updates for it, and you should think about upgrading your Joomla installation to the latest version of Joomla 3. (Please note: in this tutorial, we assume that the only eXtension that is installed is eXtroForms. We have successfully tested this migration process as described here. If you have other eXtensions installed, we cannot guarantee that your site will still work if you follow this tutorial, due to the huge number of available eXtensions. At the time this tutorial was written, the latest versions of Joomla were 2.5.27 / 3.3.6 )
Prerequisites:
- Your current site runs Joomla 2.5 and eXtroForms for Joomla 2.5 is installed (Version 1.26 or lower)
- You have downloaded eXtroForms for Joomla 3 (Version 2.0.0)
- You have downloaded the eXtroforms migration file
PLEASE NOTE: backup your site before doing any changes to your Joomla installation. Before upgrading your live site, try this on a development installation first.
Step 1: Upgrade your Joomla system to to the latest version of Joomla 3
You can do this by using the autoupdater, click on Components -> Joomla! Update and update your Joomla 2.5 installation to the latest version. After a successful update, open again the Joomla updater and click on Options. In the configuration, select 'Short Term Support' , and click on Save & Close. Now, you will see that the latest version of Joomla is displayed as 3.x.x Update again, and after a successful update, your Joomla installation will be the latest version of Joomla 3.
Step 2: Uninstall eXtroForms for Joomla 2.5 (i.e. the installed version)
Click on Extensions -> Extension Manager and select 'Manage' from the sidebar menu. Now you will see a list of installed eXtensions, search for eXtroForms, tick its checkbox and click the Uninstall button. The old version of eXtroForms will now be uninstalled from your Joomla installation.
Step 3: Install eXtroForms for Joomla 3 (Version 2.0.0)
Click on Extensions -> Extension Manager , click the Browse button and choose the eXtroForms zip file for Joomla 3. Click on Upload & Install to install.
Step 4: Use the eXtroForms migration file to update the database tables
Click on Extensions -> Extension Manager , click the Browse button and choose the eXtroForms migration zip file. Click on Upload & Install to 'install' this file, it will update the eXtroForms database tables.
Step 5: This step is optional, but we recommend doing it -> Uninstall the migration component.
Click on Extensions -> Extensions Manager and select 'Manage' from the sidebar menu. This time, search for a component called efmigration , tick its checkbox and click the Uninstall button. The eXtroForms Migration file will now be uninstalled.
2025-02-20

